Wednesday, December 22, 2010

Cake Mix Cookies

Oh my!  I do not usually like nuts in anything, but these cookies are wonderful!
My mother-in-law gave me one the other day and I was so surprised that even with nuts, I liked it.  =)
  • 1 box plain white cake mix
  • 2/3 c. vegetable oil
  • 1 egg
  • ½ tsp. almond extract
  • 1 c. chopped nuts (she used pecans)
Mix with spoon.  Work into balls and bake on cookie sheet at 350º for 8-10 minutes. 
Makes 3-3½ dozen.
Oh my, so delicious!

Thursday, December 2, 2010

Pumpkin Bread (that tastes like cake)

Rebekah made this, and it was pretty easy.
  • 3 c. sugar
  • 1 c. cooking oil
  • 4 eggs
  • 2 c. pumpkin, canned
  • 2/3 c. water
  • 1½ tsp. salt
  • 1 tsp. nutmeg, ground (she used pumpkin pie spice, which has nutmeg in it)
  • 3½ c. flour
  • 2 tsp. baking soda
Bread/cake:
Preheat oven to 350º.
Mix all ingredients.  Pour into two greased 9x5x3 loaf pans, or into a Bundt cake pan.
Bake for 1 hour. 
Rebekah used a Bundt cake pan, and had a little too much batter, so she made 6 cupcakes.  You can see them waaaaayyy on the other side of the bar. =)

Glazed Icing:
Rebekah said she thinks she used about 2 cups of powdered sugar, and several Tbs. of milk.  She isn't quite sure, haha, so you might like to go by this recipe.
Mixed together with a whisk.  Mix in a little more milk or powdered sugar as needed until you get the right consistency.  You might want more or less glaze than what is posted here.

Monday, July 26, 2010

Chicken Broccoli Ring

This is a Pampered Chef recipe, and it is sooo good!  It's probably my second-favorite recipe I've posted. The Chicken Crescent Pockets is my first. Oh, wait... maybe it's Debbie's Chili Beans. =D
Hard decision!
  • 2 c. chicken, cooked and chopped
  • 1 c. broccoli, chopped (I used 2 c. cooked broccoli)
  • ½ c. red bell pepper, chopped
  • 1 garlic clove, pressed (I used 1/2 t. garlic powder)
  • 4 oz. (1 c.) sharp cheddar cheese, shredded (I also added 4 oz. pepper jack cheese, shredded)
  • ¼ tsp salt
  • ½ c. mayonnaise
  • 2 tsp. dill mix (I left this out, but a friend said she used Pampered Chef mix)
  • 2 8-oz packages refrigerated crescent rolls
►After cooking chicken and broccoli, preheat oven to 375º.
Dice red pepper, shred pepper jack cheese.  (I use the block cheese as it is more moist).
Mix all ingredients together.  The mayonnaise helps hold the mixture together, but you can't taste it in the recipe.
►Unroll the crescent dough; separate into triangles.  Arrange triangles in a circle on a pizza pan with the wide ends toward the center of the pan, overlapping each other.  It will look like a large sun with the points hanging half off the pan. 
There should be a 5 or 6 inch opening in the center.  Spoon the chicken-broccoli mixture evenly onto widest end of each triangle.  Bring points of triangles up over filling and tuck under wide ends of dough.  (Filling will not be completely covered).  If you like, brush a beaten egg on top to make it shiny.
Bake 18-22 minutes or until golden brown.

Rebekah has a new camera -- better than mine, so I'll just have to make this again, won't I???
The pic of the Taco Ring was soooo much better!  I do believe it's my best food picture ever!
►I made the filling exactly as I wrote above, but since my family really likes broccoli, I doubled the whole filling part of the recipe (1st 6 ingredients), and we had a one-dish meal.  I wanted to put some filling in the middle of the ring (w/out the mayo), as well as save out some without red peppers for my son.
We had enough leftovers for about 3 people, and then my mother- and father-in-law came by.  He doesn't like broccoli, but my MIL does, so we gave her some, and she loved it!

Thursday, July 8, 2010

Taco Ring!

This is so awesome!  My husband saw this recipe in a magazine.  It had a picture, so he showed me and thought I'd like to make it.  =D
I'd also seen it awhile back at A Joyful Chaos.  
  • 1 lb. ground beef
  • 1 package (1.25 oz) taco seasoning mix
  • 1 c. (4 oz) shredded cheddar cheese
  • 2 T. water* (I omitted - see explanation below)
  • 2 8-oz packages refrigerated crescent rolls
  • 1 medium green bell pepper (optional)
  • 1 c. salsa (optional)
  • 3 c. lettuce, shredded (we used more -- ¾ a head)
  • 1 medium tomato, diced
  • ¼ c. onion, chopped
  • ½ c. pitted ripe olives (very optional! blech)
  • sour cream
►Preheat oven to 375°.  Brown the ground beef, then drain.  The directions say to add in the taco seasoning mix, cheese, and 2 T. water.
Instead, I cooked the beef and seasoning in the pan according to the taco seasoning directions, and since it was still moist from the water called for on the package, I omitted the 2T. water.  I added the cheese, and stirred to get it melted.  The cheese sort of helps hold the meat together.
►Unroll the crescent dough; separate into triangles.  Arrange triangles in a circle on a pizza pan with the wide ends toward the center of the pan, overlapping each other.  It will look like a large sun with the points hanging half off the pan. 
There should be a 5 or 6 inch opening in the center.  Spoon the meat mixture evenly onto widest end of each triangle.  Bring points of triangles up over filling and tuck under wide ends of dough.  (Filling will not be completely covered).  Bake 18-22 minutes or until golden brown.
(I didn't do this next part -- I just made more salad to put into the center.)
►Cut off the top of the bell pepper.  Discard top, membrane, and seeds.  Fill pepper with the salsa.
►Shred lettuce, and dice tomato and onions.  Slice the olives.  Place the bell pepper in the center of the taco ring, and arrange other salad items around the green pepper.
Click here for the picture that was in the magazine - it has the green pepper.  (ahem!  I think my pic was better.  =)

I didn't have an extra pan (that wasn't hot) to slide the taco ring onto, so I placed a saucer in the ring before adding the salad items, so they wouldn't get too hot.  Add more cheese if you like.  Top each serving with sour cream.

I did at least try 2 slices of olive. Still blech.
https://www.facebook.com/martynormanhawks/posts/1422365133141:646729090496255


Monday, June 28, 2010

Juicy Blackberry Cobbler

We have blackberries growing all alongside our driveway!  So I had to make a cobbler.

For the cobbler:
  • 3 pt. fresh blackberries
  • 2 T. butter
  • 2 c. sugar
  • 1¼ c. water or 7-Up (I used water)
  • 1 T. lemon juice (I had about ¼ t. in one of those little packs you get in a restaurant, haha!)
  • ¼ c. orange juice (I didn't have any)
Topping:
  • 2 c. sifted, self-rising flour
  • ¼ c. sugar
  • 2 c. water (my MIL had written in 2 c. so I tried that the second time, and the bread part was much better.)
(ok, it tastes better than it looks!)
Put all into a pot on medium, and get hot.  (my pot is large - I made a double recipe)  Then simmer on low for about 10-15 minutes, getting the sugar into the berries.  Mix the flour mixture thoroughly with a whisk, getting out all lumps.
Then mix about ½ 1 c. of the flour mixture into the berry mixture in the pot, before pouring into a 9x13 casserole dish.
With a large spoon, carefully spoon the flour mixture onto the berry mixture.
Bake on 375° for around 45 minutes?  The recipe didn't say, and I missed hearing my timer.  So I'm not sure how long it baked!
The recipe says when it is slightly brown, to remove from oven and add pats of butter, then bake around 15 more minutes.  I missed that, too, but it's still good!  =)
It was more "liquidy" than I realized it would be, but it did thicken up somewhat.  Still juicy, tho!  =)
I made 2 smaller ones for two of my sisters-in-law.  I'll have to get the rest of ya next time!  =)
ETA: The second time, I cooked it on the stovetop for only 5 - 10 minutes, and mixed in 1 c. of the flour mixture.  It thickened up better, but still is a juicy cobbler.  I used the 7-Up, and correct amount of juices, but didn't see a difference in the taste. The bread/topping was much better tho, since I increased the amount of water.
This time, I got to give some to my parents, Travis' parents, and my other sisters-in-law.  =) 

Friday, May 28, 2010

Ranch Roll-Ups


This recipe has been moved.
You can find it here!  =)

Wednesday, May 26, 2010

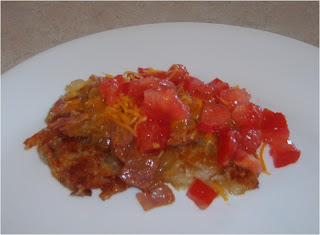
Loaded Hash Browns

So scrumptious!
  • 2 onions, diced
  • ½ green and/or red pepper, diced (red pepper is sweeter)
  • 6 slices of ham, sliced up
  • 3 T. butter
  • 4 medium potatoes, or use frozen shredded hash browns - they do shrink while cooking, so make a lot!
  • shredded cheese - about 3/4 - 1 cup
  • 2 tomatoes, diced
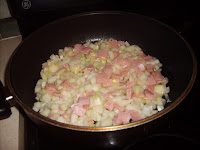
►In a non-stick pan, melt 3 T. butter.  Add diced onions, ham, and green or red peppers.  I prefer red peppers, but didn't have either on hand.
Don't use too large of a pan.  The trick is to make sure the onions cover the pan, especially in the center, so there is no space in the middle.  At  the edge of the center of a "circle" of onions, they are more likely to burn.
Cover and cook on medium high.  I like to cover with a lid for a few minutes until the onions have started to cook.  Then remove the lid and continue cooking until onions have browned, about 12 minutes or so total.

►While onions, etc. are cooking, peel and shred the potatoes.
►Remove the onions, peppers, and ham from the pan.  We usually remove them since one child doesn't like onions, but if you're cooking a smaller amount or have a really large pan, you could certainly leave them in the pan and add the potatoes/frozen hash browns.
►Add a few Tablespoons of cooking oil to the pan and let it get hot.  Pour in the potatoes, tossing a little to coat all sides.  Continue to move around for a minute or so, (not too long!) until they have started to cook slightly.  Then lightly pat them down and let them sit and cook.  If you continue stirring, they can become mushy.
►While potatoes are cooking, wash and dice the tomatoes.
►After a few minutes, when you notice the bottom edge has just begun to brown, flip them over.  They will have started to kind of clump together, and this is fine.  You can break them apart more later.  It's easier to drain when they are clumped, though.  Let them cook on the second side, and flip back if needed. 
►When you remove from pan, you can place them on paper towels for a minute.
Add onions, green/red peppers, and ham; top with cheese and tomatoes.
Some like to put it all together and bake before adding tomatoes.  
Salt and pepper to taste.

Thursday, April 29, 2010

Chuck Roast


This is sooo good.  My sister-in-law gave me a chuck roast!  =)
  • 3-4 lb chuck roast, mine had the bone in
  • 6-8 carrots, peeled and sliced
  • 6 red skinned potatoes, cut into chunks
  • 1 very large onion, cut into small chunks
  • 1½ T. steak seasoning
  • 1 T. meat tenderizer
  • 2 t. garlic salt
  • 1 T. parsley flakes
Put about ½ c. water in your crockpot.  Put in all vegetables.  Season meat on both sides, rubbing in the seasoning, meat tenderizer, salt, and garlic powder.  Place in crockpot and sprinkle all with parsley flakes.


Cook on high for 6-7 hours, or on low for 10 hours.  I turned mine on High, and meant to cook it 7 hours.  But I forgot to push the button twice, so it stayed on High for 4, then automatically shut off and went to Warm.  I noticed right before I left, and turned it on Low.  So it was High 4 hours, Warm 2 hours, Low 3 hours.
It worked out better anyway, since I didn't know I'd be going somewhere, and would need it to not be finished yet when I left.  =)
When I found I'd be leaving, and we'd all be gone during the regular meal time, we ate a little something before we left.  So we didn't go hungry because of my oversight!

Friday, March 26, 2010

Yolanda's Chicken Enchiladas

This recipe is sooo good!
My best friend Yolanda (since we were 14) gave me this recipe.

Chicken enchiladas: 
  • 2 lb. chicken
  • 2 T. Knorr powdered chicken flavor bouillon (green and yellow plastic jar -- pictured below)
  • 3-4 c. mozzarella cheese
  • 16 corn or flour tortillas
  • 1 sliced onion
►Add bouillon to a pot of water and boil chicken until tender.  It usually takes me over an hour to get it like I want it.
►Start on enchilada sauce and have rice ready to start as soon as the chicken is done.
►Remove chicken from pot, saving the liquid for the rice.   
►A good time to start the rice now.  Shred or cut chicken into strips.
Yolanda told me to get El Milagro corn tortillas, but I was unable to find them. 
If you use corn tortillas, you can place them in heated olive oil, a few seconds both sides, and shake off a little before placing in baking dish.  We tried some that I'd bought, but only Rebekah liked them.  So except for her, we used flour tortillas.
►Fill tortillas with chicken, sliced onions, and mozzarella cheese.  I poured a tsp. of liquid over the cheese in each tortilla.
Cover with saran wrap if not ready to bake yet.  Bake at 350° 12 - 15 minutes until cheese is melted.

Enchilada sauce:
  • 1 small onion, finely diced
  • 2 T. olive oil
  • 6 medium tomatoes
  • 1 jalapeño pepper, sliced in half and seeded (wear gloves!)
  • 1 garlic clove, peeled
  • 2 T. Knorr chicken flavor bouillon
  • ¼ tsp. powdered cumin
  • 1 tsp. garlic powder (not garlic salt -- the bouillon is salty)
►In large pan, fry onions in 2 T. olive oil. 
►In a pot of water, boil whole tomatoes, sliced and seeded jalapeño, and whole garlic clove for about 5 - 7 minutes until skin starts to peel from tomato. You don't want the tomato to split or all the juice will go out into the water.
►Remove from water and run all three thru food processor (with skin and all) until it is liquid.  Pour slowly into pan with onions, checking for unchopped pieces of garlic.
►Add bouillon, cumin, garlic powder; cook on low for 10 - 15 minutes until thickened.


Rice:
  • 2 T. olive oil
  • 1 c. Mahatma Jasmine rice
  • 1½ - 2 c. broth from the chicken (taste first; if too salty, add a little water)
  • 1 T. parsley flakes
  • 1 tsp. garlic powder (not salt)
  • ¼ tsp. powdered cumin
  • 1 envelope of Goya brand Sazón (seasoning) that says "con culantro y achiote" (coriander and annatto)
►Heat olive oil on medium heat, and fry dry rice for 2 - 3 minutes.  Add in broth and spices.  Cook as directed on package.
Serve with enchilada sauce poured over enchiladas.
Other suggestions: sour cream, sliced avocado, additional tomatoes.
This took awhile for me to make, since I'd never made it before.  But I think I can multi-task a little better next time.  And there will be a next time!  YUMMY!!!

Tuesday, March 23, 2010

Meatloaf


This is my mother-in-law's recipe.  =)  I love my MIL!
  • 1 jumbo egg 
  • 15 oz. can crushed tomatoes (or half tomatoes, half ketchup; or 15 oz tomato sauce) 
  • 1 tsp. salt
  • ¼ tsp. black pepper 
  • 1 large onion, finely diced (approx. 1 cup) 
  • ½ green pepper, finely diced 
  • 1 sleeve crushed Ritz crackers (about 34) OR 4 end pieces of bread 
  • 2 lb. ground chuck 
►Whisk egg in mixing bowl.  Add tomatoes, salt, black pepper, onion, and green pepper.  Crush crackers or run bread thru food processor.  Add to bowl and mix well.  Break the ground chuck into pieces, and mix thoroughly in bowl. 
►Put in non-greased 9 x 13 baking dish.  Divide in the middle so there are two loaves.  This helps it to cook more evenly.
►Bake at 350° for 1 hour, 15 minutes.  Remove from oven and carefully tilt dish and drain most of the grease.  You can get out the rest by using tongs to press a paper towel down in the corners.
Spread ketchup over the top of the meatloaf and return to oven for 15 more minutes.
If making half a recipe, cut first cooking time to one hour.

--Once I didn't have crushed tomatoes or tomato sauce, so I ran 3 medium tomatoes thru the food processor, and it made about 10 ounces.  I added ketchup to make up the difference, and did not use salt.

--I've also used one 10 oz. can of tomato soup, and 5 oz. ketchup - just filled the soup can halfway.

We had meatloaf tonight with creamed potatoes, green peas, salad, and yeast rolls (that Bethany made =) with honey butter.  Yummy!
We ate about half that recipe of meatloaf.  (fam. of 5 w/ one 12-yo boy)

Friday, March 19, 2010

Debbie's Chili Beans


This recipe has been moved.
You can find it here.  =)


Cooking Conversion Calculator

From their website: 
"Forget how many teaspoons in a tablespoon? Or how many cups in a gallon?
Here's an easy to us conversion calculator that will help you convert various cooking units. Use it to convert cooking units."
Also see conversion of dry beans, cooked beans, canned beans.
Many more helpful links and recipes!
Go to ReluctantGourmet.com.

Friday, March 12, 2010

Chicken Fajitas

  • 4 large chicken breast halves
  • 1 large red pepper, seeded, sliced
  • 1 large green pepper, seeded, sliced
  • 1 large onion, sliced
  • 3-4 cloves of garlic, finely chopped
  • 1 tsp. crushed basil
  • ½ tsp. oregano
  • 1 tsp. salt
  • 3 T. olive oil
  • 12 flour tortillas
Rebekah has been wanting Chicken Fajitas, so she and I made this today.  Heat oil in large skillet.  Add in garlic, sliced green and red peppers, and onions.  Add spices. Thinly slice chicken and add to pan.  I sliced mine about ¼ inch thick.  Cook on medium high, uncovered for about 10 minutes until chicken is cooked through and vegetables are tender.
If you have very much liquid left from the vegetables, tilt pan and spoon out liquid into a small bowl.  Some people like to use this for dipping.
We served ours with shredded cheese, sour cream, and tomatoes.  Some recipes I found online served them with salsa.
These were soooo good!  I just wish I had made extra for leftovers tomorrow!  =)
Other ingredients on various recipes I saw:
1 tsp. chili powder, 1 tsp. black pepper, cilantro, 2 tsp. lime juice to sprinkle over top, 1 tsp. ground cumin.

Saturday, February 20, 2010

Grilled Ham, Egg, n Cheese

Yummy breakfast sandwich!  Just like grilled cheese, but with ham and egg. 
Scramble egg first, then make your sandwich.  Grill with a little butter in pan on medium heat.
Eat with a fork!  =)

Tuesday, February 16, 2010

Burgers!

We had hamburgers and deerburgers tonight.   I'm sure you know how to make burgers, so here's a picture, no recipe.  =)  I will add that deer has virtually no grease and doesn't draw up as much as hamburger.
The deerburgers were from the deer that JohnDavid got a couple of months ago.  I love deer stew and deer in vegetable soup, but I just can't get used to the taste of deerburger.  I tried, I really did.  I ate them a couple of times, but decided I wasn't going to be able to acquire a taste for it.  But the kids love it!  =)
The oven potatoes were made with garlic salt and Italian seasoning.

Monday, February 15, 2010

Garlic Pizza Pockets

  • ½ stick of butter, more if for dipping
  • ½ t. garlic powder,more if for dipping
  • 1 t. parsley flakes
  • ¼ t. oregano
  • 6 slices of ham
  • 8 oz shredded mozzarella cheese
  • ¼ c. chopped onion
  • 1 tube refrigerated pizza dough, not thin crust (prevents tearing)
  • 2 - 4 T. pizza sauce (optional), plus extra for dipping.  I would probably only use 2 T. since I'm also using the garlic butter.     I don't want it to run off the edge.  =)
►In microwavable mixing bowl, melt ½ stick of butter.  Add ½ t. garlic powder, parsley flakes, and oregano.  Stir together.
Cut the ham into small squares with pizza cutter and add to mixing bowl.  Add mozzarella cheese, onions, and pizza sauce.  Stir together until you can see the parsley (or sauce if you used it) is evenly distributed throughout.
I made mine without sauce this time.  It wasn't dry because of the butter and melted cheese.
►Spray cookie sheet, and lightly spray plastic cutting board if you have one.  Unroll pizza dough onto cutting board (easier to handle if cold), stretching slightly.  With pizza cutter, cut into eight pieces.
►Spoon 1/3 - 1/2 c. mixture onto each piece in center, making sure none is near the side edges.  Pick up the dough by the thickest end and stretch slightly as you fold it over to the other end.  Press edges together with fork, being careful not to puncture the dough.  Carefully place on greased cookie sheet.
►Bake at 425º for 12-15 minutes until lightly browned.
Makes eight.
Great with salad!
►Serve with pizza sauce or garlic butter (1 stick butter to 1 t. garlic powder).
JohnDavid even liked it without pizza sauce in it.  =)
It was a success!!!

Tuesday, February 9, 2010

Super Bowl

I'm finally feeling well enough to post.  Been "under the weather." 
No recipe, but here's a picture of my sister-in-law's chili beans staying hot on the wood stove!
We all went to my father-in-law's Sunday night after church.  He had the TV set up in his building, and with heat from the wood stove, we were plenty warm.  It's just like the stove we had in our home while I was growing up.  =)
Everyone brought different things, and it was chaotic and fun.  I printed football and Colts coloring sheets for the younger kids, and football bingo for the older ones.  They marked off plays as they happened.  Bethany won!

As for what we had planned to post here, things did not work out the way we'd planned.  The girls and their cousin were going to make a Super Bowl cake with fondant, iced yardage lines, and logos of both teams.
We got snowed in.  Well, on this hill we live on, it does not take much!
Their cousin had the cake mixes, icing tips, and the right pan they needed.  We had the stuff to make fondant.
We just couldn't get it together. 

But there was plenty to eat.  Chili beans, tortilla chips, cheese, and sour cream... hamburgers and hot dogs w/ homemade chili... brownies, homemade strawberry cake with yummy strawberry icing...  3-cheese seasoned tortillas... and more!  Hope everyone had a great time with family and friends, and I'll have more recipes soon.  =)

Friday, February 5, 2010

Diaper Cake!

Well, this cake is not edible. 
It's a diaper cake! Beautiful isn't it? 
My mother-in-law and I made it.  I can't remember how many diapers we used - it was over six years ago, but I'll explain it the best I can.
~We used white diapers, not patterned.
~I know we used size 2 diapers.  That way the mother could wait a little while before taking it apart.
~We opened the diapers and wound them around length-ways.  I used a piece of masking tape to attach one overlapping diaper to the next, since I didn't think that would stick to the diaper as much and ruin it.  Seems like I stuck the tape to my skirt first to reduce the stickiness.  We did this until the last layer, where the tape would be seen, then I think we used a loop of inside-out tape under the edge of the diapers.  Prob only 4 or 5 diapers on that last row.
~We used ribbon on the top and bottom edges on the bottom and middle levels, and this helped the last layer of diapers stay put.

Here's what we used as decorations:
  • about 3 dozen rosebuds (different shades) already fastened to thin wire.  These we bent the sharp ends over and pushed between the last 2 layers of diapers on each level, and bunched 3 together at the top.
  • Small strings of beads, looped over the rosebuds, and hung in a U shape
  • Beaded, lacy ribbon around the top and bottom edges of each level.  This helped the hanging beads stay in place.  I'm sure we used tiny bits of tape here under the ribbon, too.
  • Extra lace that was wider, that we pushed under the edge of the bottom level, and affixed to the pan it was on with small pieces of tape
  • pair of black shiny shoes
  • comb and brush set tied with ribbon
  • $1.00 wrapped in ribbon
  • lacy socks
  • pink toothbrush tied with ribbon
  • fork and spoon set tied with ribbon
  • translucent pale pink teether
  • several light pink hairbows at the base of the top level
  • tiny doll for the topper
~In the top level of the cake, we folded the diapers in half length-ways, because the regular width of the diaper was too tall.
We started with the bottom level, and kept wrapping until we got it nearly the size of the pan.  It's a silver pizza pan, and you can barely see it under the edge of the lace.
Then we did the middle until we got it to size, then the top.
~It's good if you have a slim dowel rod or something to go down through the middle to keep the levels lined up, and so the top ones won't fall off. 
~We just positioned the doll topper and shoes as the main accessories, then filled in the other pieces by carefully pushing between the layers of diapers.
We probably used a little tape to keep the socks, shoes, and the doll topper in place.
~Remember, your accessories need to have a little color.  The white socks have a little dark mauve in the lace.  You can have everything lacy and dainty, or go more colorful, or more boyish. 
The Mom-to-be that received it said she was going to have a hard time taking it apart!
This was definitely not a quick project, but it was worth it.
I just LVE this picture!

Thursday, February 4, 2010

Super Bowl Snacks!

A couple of years ago, we made football-shaped chocolate rice crispies.
Last year we made football brownies!

This is Rebekah putting on the laces.
I got the idea from the Betty Crocker website. Of course, ours don't look quite as perfect as theirs, and the pics were made w/ my fuzzy cell phone, but my kids had a good time decorating them.
We also had salsa and chips - shown here in our football-shaped serving dish. Heat the salsa and add sour cream.... de-LISH!
My mother-in-law bought all of us these cool
football cups. :o)
We also had Totino's pizza rolls (on sale for .50 per box!), and veggies and dip -- finger food! Perfect for a football game. :o)

New plan for this year... hope it ends up well.  Stay tuned. =)